The Physical Environment
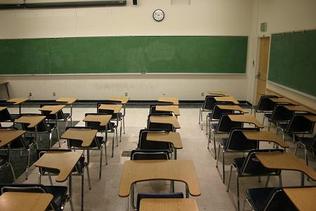
Many times the custodian, not the teacher, arranges the classroom. How often have you seen the layout illustrated in the picture above? This set-up—desks arranged in long rows—does not give you the ability to reach every student (especially those in the far corners) quickly. This arrangement actually creates barriers between the left side of the room and the right side of the room, which cuts you off from your students. While this layout is best for cleaning, it is not conducive for effective classroom management.
Tip: Before you arrange your classroom to fit your needs (and your students’ needs), meet your custodian. Let him/her know what you are trying to accomplish and ask how you can work together to make each other’s jobs easier. Building good relationships with your custodians will not only benefit you in the long run, but it will make your life so much easier!
Tip: Before you arrange your classroom to fit your needs (and your students’ needs), meet your custodian. Let him/her know what you are trying to accomplish and ask how you can work together to make each other’s jobs easier. Building good relationships with your custodians will not only benefit you in the long run, but it will make your life so much easier!
First Things First: burn the desk
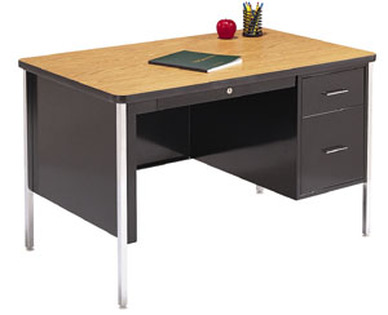
Think about your desk. Do you actually use it, or has it become a stockpile of papers, homework packets, and materials? Where is it located? Do you find yourself constantly running into it, or is it shoved into a corner?
Traditionally, the teacher’s desk is located at the front of the desk. Why is this a problem? In the words of Fred Jones, “it costs you eight feet of proximity with every student in the classroom!” (Jones, 2007). By moving your desk from the front of the classroom, you can move your students approximately eight feet closer to you, which will place them in the action zone (more on this in Proximity and Mobility). By moving your students’ desks closer to the front, you do not have to walk as far to reach them when a problem occurs. Also, the students located on the sides will have better viewing angles to see the whiteboards/projector.
Bottom line: move the desk. It is not a necessary piece of furniture (chances are, you don’t even use it!), and it is more harmful than helpful. Either move it to the back of the room or get rid of it entirely.
The Interior Loop
One of your main concerns when arranging your room is mobility. You want to be able to move freely and easily among your students in order to monitoring their work and address misbehavior.
Ask yourself this question: How can I arrange my classroom so that I will have to walk the fewest amount of steps in order to reach every student’s desk? Meet the interior loop.
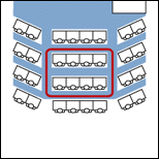
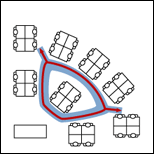
An interior loop is a pattern of movement like the one described above. Look at the two pictures below. See how each interior loop allows the teacher to read the work of every student? Your interior loop will vary depending on your preferred learning style. If you want to encourage partner interactions, the first arrangement would be ideal. If you prefer collaborative learning, the second one would be best.
Ask yourself this question: How can I arrange my classroom so that I will have to walk the fewest amount of steps in order to reach every student’s desk? Meet the interior loop.
An interior loop is a pattern of movement like the one described above. Look at the two pictures below. See how each interior loop allows the teacher to read the work of every student? Your interior loop will vary depending on your preferred learning style. If you want to encourage partner interactions, the first arrangement would be ideal. If you prefer collaborative learning, the second one would be best.
 |
 |
Action Zone
This is something we will go into in further detail in the next page, but it needs to be addressed here, as well. Simply put, the action zone is the area directly surrounding the teacher. It is the location within which most students thrive, as the teacher’s presence encourages on-task behavior. Your goal is to place as many students as possible inside the action zone at all times. Mobility allows you to constantly change the action zones so that every student, at one point or the other, has time within the action zone.
Ambiance
Defined as “the feelings that an individual gets when entering a place,” ambiance is an important element of the physical environment. When a classroom is well organized and carefully arranged, it creates feelings of warmth and safety. It can also generate a sense of excitement Using bright colors and interesting pictures/visual aids to decorate your resource walls can be useful. If you do not feel artistically inclined, you can give your students the charge of decorating the walls. This can be beneficial, for not only is it an enrichment activity, but it is one that gives students ownership in the classroom (Savage, 2010).
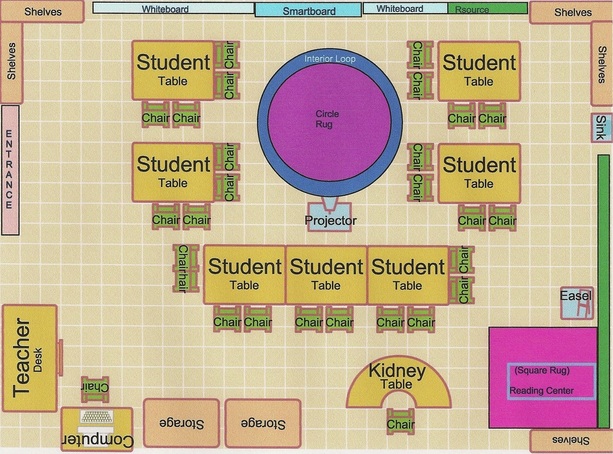
In a 4th Grade Classroom
Below you will find an example of an effective arrangement of the physical environment in a 4th Grade regular classroom. As you can see, the desks are arranged for collaborative learning and the circle rug in the middle creates a natural interior loop. The circle rug also provides an alternative mode of instruction, as the teacher can have the students all move to the circle rug for direct instruction. This will place every student in the action zone and give everyone an opportunity to learn in a different posture (many students tire of sitting at their desks). Chairs can be easily added to the front outside desks to create room for a class size of 28 or more.
Scriptural Support
"By wisdom a house is built, and by understanding it is established." Proverbs 24:3 (ESV)
Arranging your classroom takes wisdom and foresight, careful planning, and an understanding of both your needs and the needs of your students. An efficient classroom arrangement is not carelessly designed: each piece of furniture is very purposefully placed so as to create a fluid environment, one that supports and aids the learning process.
Arranging your classroom takes wisdom and foresight, careful planning, and an understanding of both your needs and the needs of your students. An efficient classroom arrangement is not carelessly designed: each piece of furniture is very purposefully placed so as to create a fluid environment, one that supports and aids the learning process.
